
If you work with trees (phylogenetics or not) and you regularly use python, you have probably used or heard about one of the following packages: Bio.phylo, dendropy or ETE.
While each one of those packages has its own unique strengths and weaknesses, I particularly like the ETE module. Here is why !
This post is based on one of my past presentation at monbug. I actually convert the ipython notebook to this markdown with nbconvert as described by Christopher S. Corley on his blog. The config I used with nbconvert can be found here. The github repository with all the original files for the presentation can be found here : monbug_ete. You can use nbviewer to view the notebook directly if you prefer.
What’s ETE ??
ETE is a python Environment for Tree Exploration created by Jaime Huerta-Cepas.
It’s a framework that assists in the manipulation of any type of hierarchical tree (ie reading, writing, visualisation, annotation, etc). The current latest version is ete3.
Installation
You can install ETE with pip : pip install ete3. Check this link for more details about optional/unmet dependencies : http://etetoolkit.org/download/
Quick introduction to the API
A great in-depth tutorial for working with tree data structure in ETE is provided by the authors : http://etetoolkit.org/docs/latest/tutorial/tutorial_trees.html. I’m going to make a light introduction to the API here, but I really recommend you to read the official doc!
Let’s take a quick glance at the available tree data structure in ete :
In [58]:
import ete3
import inspect
print([x[0] for x in inspect.getmembers(ete3, inspect.isclass) if x[0].endswith('Tree')])
1
['ClusterTree', 'EvolTree', 'NexmlTree', 'PhyloTree', 'PhyloxmlTree', 'Tree']
As you can see, you have a basic tree data structure (Tree) and more specialized tree structures, like PhyloTree for phylogenetics
=> ETE can read tree from a string or a file
In [59]:
from ete3 import Tree

rand_newick = "((((a,b), c), d), (e,f));"
rand_tree = "rand_tree"
with open(rand_tree, 'w') as TREE:
    TREE.write(rand_newick)

# Reading tree t1 and t2
t1 = Tree(rand_newick)
t2 = Tree(rand_tree)
=> In ete, a tree is a Node. This implies that the root is a Node, so are all its descendants.
In [61]:
print(t1)1
2
3
4
5
6
7
8
9
10
11
/-a
/-|
/-| \-b
| |
/-| \-c
| |
--| \-d
|
| /-e
\-|
\-f
=> You can add information to nodes by adding features
The following code will traverse the tree t1 and add a feature sexiness to each leaf.
In [62]:
from numpy import random

# Traverse : levelorder, preorder, postorder
for node in t1.traverse("levelorder"):
    if node.is_leaf():
        # add a features : randomness
        node_rand = random.randint(10)
        node.add_features(sexiness=node_rand)
=> Features are just attributes.
In [63]:
# print t1 again with features : name and sexiness
print(t1.get_ascii(attributes=['name', 'sexiness']))
1
2
3
4
5
6
7
8
9
10
11
/-a, 8
/-|
/-| \-b, 1
| |
/-| \-c, 9
| |
--| \-d, 3
|
| /-e, 9
\-|
\-f, 3
=> You can search by features
In [64]:
# search by features
print(t1.search_nodes(sexiness=8))
print(t1.search_nodes(name='a'))
1
2
[Tree node 'a' (-0x7ffff810443aa570)]
[Tree node 'a' (-0x7ffff810443aa570)]
=> Here is a quick list of useful functions
In [65]:
# get sister node =====> get_sisters()
sister = (t1&'a').get_sisters()
print("\nSISTERS of  a : ")
print(sister)
1
2
SISTERS of a :
[Tree node 'b' (0x7efbbc55ab0)]
In [66]:
# get children  =====> get_children()
root_children = t1.get_children()
print("\n\nFIRST CHILD OF ROOT")
print(root_children[0])
1
2
3
4
5
6
7
8
9
FIRST CHILD OF ROOT
/-a
/-|
/-| \-b
| |
--| \-c
|
\-d
In [67]:
# Get the  LCA (Latest Common Ancestor) of multiple node ====> get_common_ancestor()
lca = t1.get_common_ancestor(['a', 'b'])
print("\n\nLCA (a, b) : ")
print(lca)
1
2
3
4
5
LCA (a, b) :
/-a
--|
\-b
In [68]:
# RF (Robinson-Foulds) distance between t1 and t2.
# Recall that t1 and t2 have the same newick ...
rf = t1.robinson_foulds(t2)
print("\n\nRF DISTANCE between t1 and t2 :")
print(rf[0])
1
2
RF DISTANCE between t1 and t2 :
0
Introduction to tree visualization with ete
Data : a random tree with random branches
- Tree rendering
- Tree Style
In [71]:
from ete3 import Tree

# Generate a random tree (yule process)
t = Tree()
t.populate(8, names_library=list('ABCDEFGHIJKL'), random_branches=True)

print(t.get_ascii(attributes=['name', 'support'], show_internal=True))
1
2
3
4
5
6
7
8
9
10
11
12
13
14
15
/-G, 0.47936
/, 0.11319
| | /-F, 0.53403
| \, 0.52094
-, 1.0 \-E, 0.89822
|
| /-L, 0.27682
\, 0.32620
| /-K, 0.50173
\, 0.07320
| /-J, 0.14208
\, 0.93141
| /-I, 0.05555
\, 0.87512
\-H, 0.81088
=> Trees can be saved as images. Supported format are png, pdf and svg.
In [74]:
t.render('tree.png', dpi=200)
=> You can use TreeStyle to change how the tree is displayed
In [75]:
from ete3 import TreeStyle

ts = TreeStyle()
ts.show_branch_length = True # show branch length
ts.show_branch_support = True # show support

# rotate the tree by 30 degree
ts.rotation = -30
t.render('tree2.png', tree_style=ts)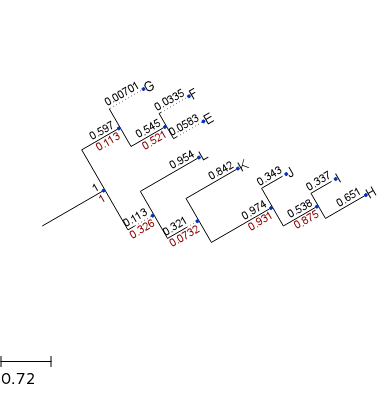
Let’s draw a circular tree now
In [76]:
ts.rotation = 0
ts.mode = "c" # use circular mode
ts.arc_start = -180
ts.arc_span = 180
t.render('tree3.png', tree_style=ts, w=500)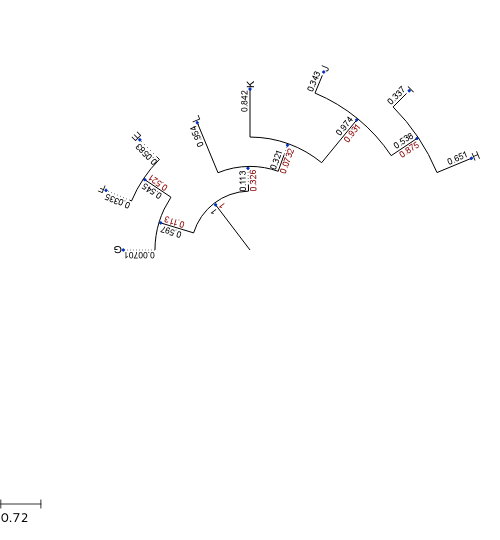
=> faces are wonderful
faces allow you to add graphical informations to a node. It can be a simple Text, an Image or a more useful information like a Chart or Sequence domains.
Here is the list of available faces :
In [77]:
# Adding face to Tree
from ete3 import faces
print([f for f in dir(faces) if 'Face' in f])
Image('face_positions.png')
1
['AttrFace', 'BarChartFace', 'CircleFace', 'DynamicItemFace', 'Face', 'ImgFace', 'OLD_SequenceFace', 'PieChartFace', 'ProfileFace', 'RandomFace', 'RectFace', 'SeqMotifFace', 'SequenceFace', 'SequencePlotFace', 'StackedBarFace', 'StaticItemFace', 'TextFace', 'TreeFace']
Faces can be added at different areas around a node.

With Faces, you can actually make things like this (treeception) :

It’s also possible to define a layout function that will determine how a node will be rendered. Let’s see how to do that and in which cases this could be useful with the next example.
Application 1 : Duplication|Loss history of a gene familly
Data : genetree newick where I have already added a feature (states) :
- states = 1 ==> internal node with duplication
- states = 0 ==> internal node with speciation
In [80]:
from ete3 import Tree
t = Tree('annoted_trees', format=2)
print(t.get_ascii(show_internal=True, attributes=['name', 'states']))
1
2
3
4
5
6
7
8
9
/-Dre_1, 0
/, 0
| | /-Cfa_1, 0
| \, 0
-, 1 \-Hsa_1, 0
|
| /-Dre_2, 0
\, 0
\-Cfa_2, 0
In [81]:
from ete3 import Tree, faces, TreeStyle
import utils

# Creates a layout function
def mylayout(node):
    if node.is_leaf():
        # add a face for its scientific name
        longNameFace = faces.TextFace(utils.get_scientific_name(node))
        faces.add_face_to_node(longNameFace, node, column=1)

        # add an image Face
        node.img_style["size"] = 0
        image = utils.get_image(node.name)
        faces.add_face_to_node(faces.ImgFace(image), node, column=0, aligned=True)

    # If node is a duplication node
    elif int(node.states) == 1:
        # Set the style as a green square
        node.img_style["size"] = 6
        node.img_style["shape"] = "square"
        node.img_style["fgcolor"] = "green"

    # If node is a speciation node
    else :
        # Set the style as a red circle
        node.img_style["size"] = 6
        node.img_style["shape"] = "circle"
        node.img_style["fgcolor"] = "red"


# And, finally, display the tree using the layout function
ts = TreeStyle()
ts.show_leaf_name = False
ts.layout_fn = mylayout

t.render("tree4.png", dpi=600, tree_style = ts)
Application 2 : Phylogenetic tree, protein sequence and information content
Data :
- An alignment
- A tree constructed using that alignment (Actually those two were randomly generated)
In [82]:
from ete3 import PhyloNode, SequenceFace, faces, TreeStyle
from Bio import AlignIO
from Bio import Alphabet
from Bio.Align import AlignInfo
from utils import show_file

alignment = "alignment.fasta"
tree = "phylotree.nw"

# Open tree and link alignment to it
t = PhyloNode(tree)
t.link_to_alignment(alignment)
show_file(alignment)
show_file(tree)
1
2
3
4
5
6
7
8
9
10
>A
MAEIPDETIQQFMALT---SNIAVQYLSEFGDLNEALNSY
>B
MAEIPDATIQQFMALTNVSHNIAVQY--EFGDLNEALNSY
>C
MAEIPDATIQ----LTNVSHNIAVQYLSEFGDLNEALNSY
>D
MAEAPDETIQQFMALTNVSHNIAVQYLSEFGDLNEAL---
(A,(D,(B,C)));
In [83]:
# Compute Information content with Biopython
align = AlignIO.read(alignment, 'fasta', alphabet=Alphabet.Gapped(Alphabet.IUPAC.protein))
summary_info = AlignInfo.SummaryInfo(align)
total_ic_content = summary_info.information_content()
ic_content = summary_info.ic_vector.values()

# Set TreeStyle
ts = TreeStyle()
ts.branch_vertical_margin = 10
ts.allow_face_overlap = False
ts.show_scale = False
ts.show_leaf_name = False

# Align ic plot to TreeStyle header
ic_plot = faces.SequencePlotFace(ic_content, fsize=10, col_width=14, header="Information Content", kind='bar', ylabel="ic")
ts.aligned_header.add_face(ic_plot, 1)

#t.add_face(ic_plot,1)
t.render("%%inline", tree_style=ts, dpi=300)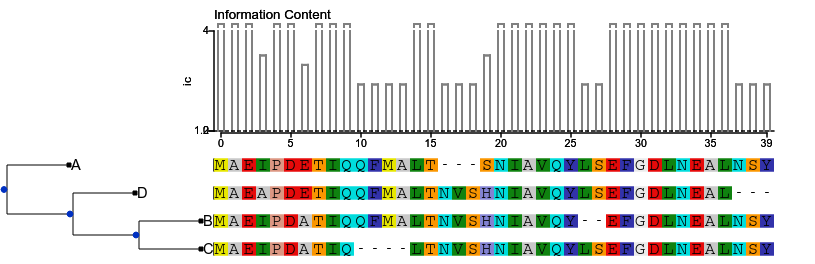
You can do a lot of things with ete if you take the time to learn how to use it. I didn’t have time to talk about ClusterNode, EvolNode or all the other great modules of ete, but I hope this post spark your interest and was useful to you.
Also, READ THE DOCS.